Friday, February 5, 2016

Cosy Kitchen Floor Too

An extended break from work between Christmas and New Years was to be our be all and end all of the floor installation process....... it had after all been  months since it started, okay so closer to a year - but the cutting and planning really didn't start until after Thanksgiving.

Once we were comfortable with the cutting process - a warmer ambient room temperature and direct heat to more difficult cut areas was working well for us. Our inspiration pieces were on the worktable.

We were cutting and taping our pattern together and getting braver by the day.


We were FINALLY ready to tape the small pieces to the larger pieces and see the "Big Picture"


Some things we liked and some things we didn't.  It was a fluid process. Organic. Discussion worthy. Beer and wine drinking worthy....... time-outs worthy, but we pushed on......

I have to admit that I had to let go of MANY preconceived notions of how exactly this would look, how we would proceed and how often we disagreed on design and process. But in the end, together, we made a beautiful design that we both love and will enjoy looking at for a long, long time!


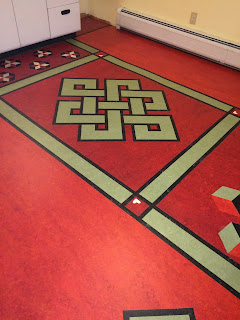
we dry fit the entire floor and taped it off in sections. Using the Forbo adhesive we set to adhering our biggest puzzle challenge ever! We used the 100 lb. roller (thank you Taylor Rental in Gardner for being so patient with me.....www.taylorrentalgardner.com ) And after waiting 24 hours we removed  the tape!!


I cleaned up the small bits of adhesive that had come through with mineral spirits and will seal the floor with a couple of coats of Forbo residential floor finish.

We could not have accomplished this without the patience of our families who pushed and prodded and encouraged us all along the way. A special thank you to (my daughter) Samantha Boudreau, Interior Design & Planning, MoharDesign for her assistance with the flooring choices and to Matt O'Keefe, Sales Exec at Forbo Flooring NA for his guidance in materials and application.

Next kitchen chapter?

My Cosy Kitchen Floor


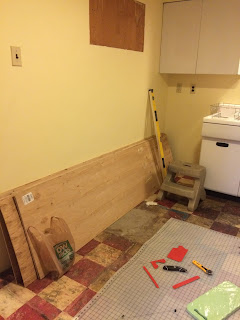
We've married, we've moved, we've sewn and quilted, we've woven and painted and now we add linoleum inlay to our repertoire! When we purchased our home the kitchen looked like this:

and we were pretty excited! Original Morton metal cabinets in great shape, double enamel sink with side drains. The floor however was peel and stick; or rather peeled and not stuck so well.  We decided to take a peek under the noisy, crackly, marble-like  flooring. What we found was old red and white linoleum. Hand cut 9" squares - on most of the floor.....
undeterred we decided to try and salvage what we could..... we cleaned and scrubbed, scraped, sanded (yes, sanded), and tried just about every combination and concoction we could think of, find on Pinterest and pick the brains of everyone we knew (and some we didn't) but finally succumbed to the idea of covering the old floor with a new one.
We layed a subfloor of plywood and then we moved on to the process of tiling......

Let me say this before we continue. It was a long process, admittedly self imposed, but still a long one.  Knowing this was going to be our one and only home we wanted to do something special, something that was one of a kind, that reflected our love for each other and our 'little slice of heaven' cape.   Being quilters we started looking at designs and then stumbled upon  Laurie Crogan and her amazing talent. http://www.inlayfloors.com/WORKS/RUGS/1/thumbs/  Not only did she inspire us, but she answered my emails and coached! We are very grateful that she personally took the time to guide us!

What started as a solid floor with a carpet design in the middle took on a life of its own.  Using Forbo Marmoleum in 3127 Bleeckerstrret, 2939 Black, 3131 Scarlet and 3240 Willow. We had a few 6" x 9" samples in shades of white and we used those for accent.
 

Our first thoughts were around a tumbling block (six point star pattern) but it proved to be too much cutting and a bit busy for the small space. Our kitchen measures 9'10" x 12'. So we started thinking along the lines of the central carpet in tumbling blocks, then we migrated to a Celtic knot......

We started practice cutting......
then finally got down to business.......,.,

Monday, November 3, 2014

The Match Safe


Grandma Faria's match safe. I still use it every day! Saw one on Pinterest and thought I'd share my own.

Wednesday, October 8, 2014

Frugal fritter...............

It started a while ago, my obsession with getting that potato fritter recipe..... still have not found one that seems quite right but I will continue to hunt..... In the meantime, meals are prepared and eaten and conversations made. One Saturday recently while driving around looking for Buffalo China and nice neighborhoods with homes for sale, we stopped to have some lunch. Jamie went for the fried clam special, but I had the clam chowder with - you guessed it - fritters! Those clam fritters were good, not Auntie Mary good, but pretty darn close....... good food memories make me happy.

 So the other night I am trying to decide how to cook some chicken breasts and I open the pantry cabinet for inspiration and there is a photo of fried chicken on the side of the Bisquick box. I improvise.....I use the Bisquick and mix it with some Italian bread crumbs. Dip the chicken in an egg wash and then the dry mixture and pan fry the breasts.... very light and crispy.... how happy was I?????? (pretty happy)

Unfortunately in my zeal to make 'enough' I had about a cup and a half of the Bisquick/crumb mixture left and a bowl full of egg wash...... I hate throwing away food. I quickly mixed them together and fried little balls..... they were pretty good for an experiment.....

Tonight I came home and had an opportunity to make what ever I wanted as I would be eating alone.....I mixed together:

1/2 cup bisquick
1/2 cup Italian bread crumbs
1/8 c grated pecorino
1 egg and enough milk to give me a stiff batter

Then I fried away...... better than the first experiment. Light and fluffy and just enough seasoning.

Next time..... chopped clams and a little anchovy and those will be perfect!

I am a sucker for comfort food. It doesn't necessarily have to look good to make me feel good......
 

Sunday, October 5, 2014

experimental

I didn't have the label of this fiber to list it here, but I should say up front that every item I have woven (excluding the two scarves from the initial class) have been created using clearance yarn. My experiments need to be affordable because I anticipate snafu's.........

This piece is acrylic, that much I remember. I probably should have used a smaller gauge heddle  as the difference between the warp and that finished project was substantial. That being said, I tried my hand at different combinations and did a bit of hand weaving insertions.

Now, I must get to my quilting ................................


Wool and acrylic blend......


So.......I like how this looks but I combined wool and acrylic. In the beginning isn't it all about making mistakes????  I am not sure how this will handle being cleaned but my foray into warping with different colors was fun and a lesson in patience. My calculations didn't exactly add up and the piece is large - 12" x 60" not including the fringe.  
Patrons Classic Wool Worsted (variegated) in Lotus and Lion Brand Wool-Ease Chunky in Spice

The Initiation


The first  two scarves woven at The Weaving Shed in West Boylston, MA. The light red/purple was cotton warp and alpaca weft and the second was all alpaca. Still afraid to put them to water, but the cold weather is coming and I will be forced to partake so we can actually use them!